You might have known that Google will be retiring Universal Analytics in July 2023, and moving everything to GA4 (google analytics 4). As a result, website owners must set up GA4 as soon as possible. For ecommerce sites there’s the additional problem of getting ecommerce tracking working in GA4 as well. For Shopify stores this process was very simple on Universal Analytics, but is more difficult on GA4. You will need to have both GTM (Google Tag Manager) and GA4 installed on your Shopify store in order to finish this procedure. Read further to find out how to set up GA4 ecommerce tracking on Shopify store without installing apps or using developers.
What is Google Analytics 4 (GA4)?
GA4 (Google Analytics 4) is the latest version of Google’s web analytics platform, and represents a major shift in the way businesses collect, analyze, and act on data. Unlike previous versions of Google Analytics, which focused on tracking pageviews and sessions, GA4 is designed to provide a more holistic view of the customer journey, from acquisition to conversion and beyond. With GA4, businesses can track a wide range of user interactions across multiple devices and platforms, including websites, mobile apps, and even offline events. This allows businesses to gain deeper insights into their customers’ behavior, preferences, and needs, and make data-driven decisions to optimize their marketing and sales strategies. Additionally, GA4 includes advanced machine learning capabilities that can help businesses uncover hidden insights and opportunities, and streamline their data analysis processes. Overall, GA4 represents a powerful tool for businesses of all sizes and industries to improve their online performance and drive growth.
What is Google Tag Manager?
Google Tag Manager GTM (Google Tag Manager) is a free tool provided by Google that allows businesses to manage and deploy marketing and analytics tags on their website without the need for manual coding. Marketing and analytics tags are snippets of code that are added to a website to track user behavior and collect data for analytics and marketing purposes.
GTM makes it easy for businesses to add, edit, and remove tags from their website through a user-friendly interface, without needing to access the website’s codebase. This can save businesses time and resources, and allow them to more quickly and easily make changes to their tracking and marketing strategies.
Additionally, GTM includes a wide range of built-in templates and integrations for popular marketing and analytics tools, making it easy for businesses to get started with advanced tracking and analysis. Overall, GTM is a powerful and flexible tool that can help businesses streamline their digital marketing and analytics efforts and make data-driven decisions to improve their online performance.
Steps to Install Google Tag Manager (GTM) on Shopify
Installing Google Tag Manager (GTM) on your Shopify store can be a great way to streamline your digital marketing and analytics efforts, and gain valuable insights into your customers’ behavior. If you hire an ecommerce SEO services company, they will do GTM as well as GA4 setup for you. However, if you are doing it yourself follow these steps.
First Phase: Under <head>, add the script for the GTM container and customer details to the theme.liquid.
Step 1: Log into your Gmail account.
Step 2: To access Google Tag Manager, click on: https://tagmanager.google.com/
Step 3: Choose the right GTM account
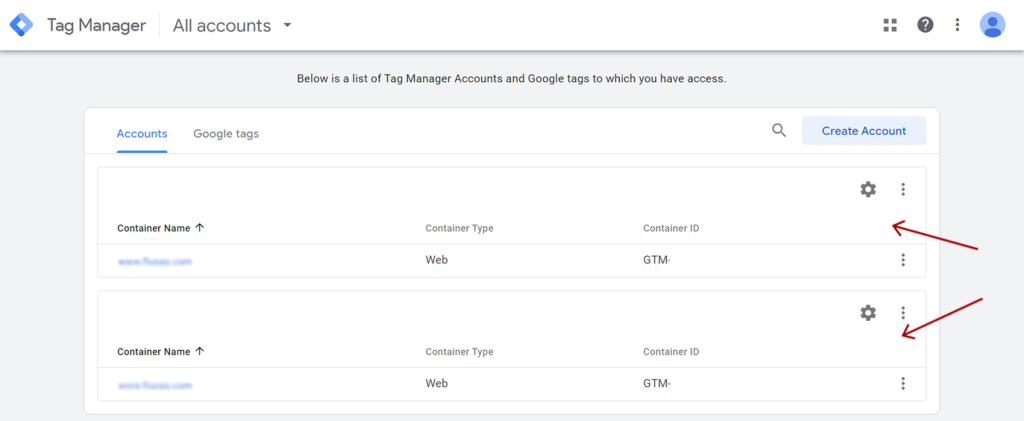
Step 4: Click on the ID of the GTM Container.
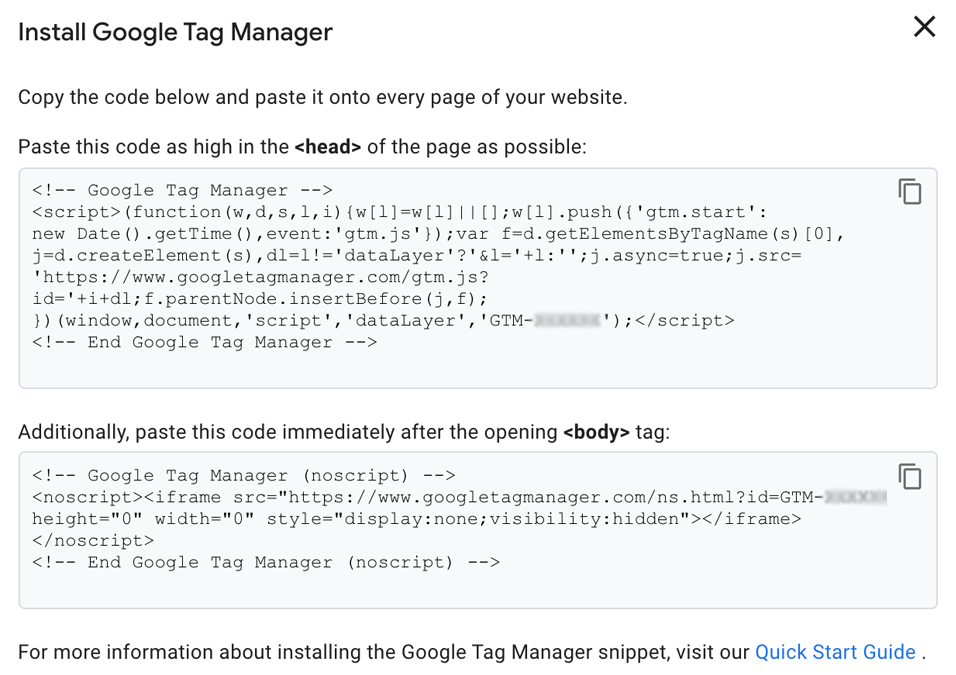
Step 5: Copy the first script of the GTM container code that incorporates guidelines to paste the code into the <head> segment.
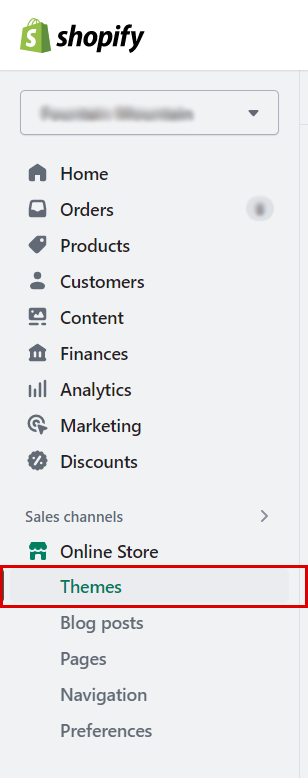
Step 6: Sign in to your Shopify store and select Themes from the left-hand navigation panel under Online Store.
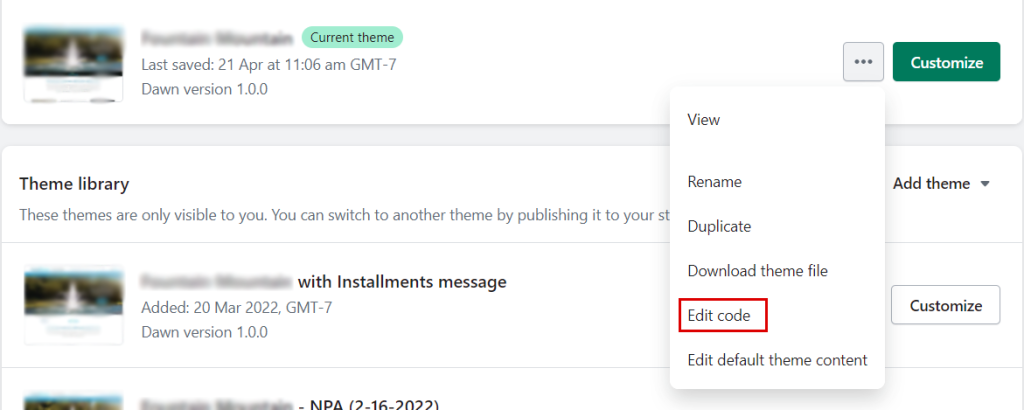
Step 7: Select Edit code from the Actions drop-down menu.
Step 8: Select theme.liquid from the Layout menu.
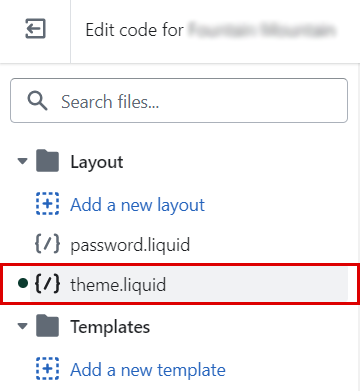
Step 9: Paste the copied GTM container code as high as possible in the page’s <head>.
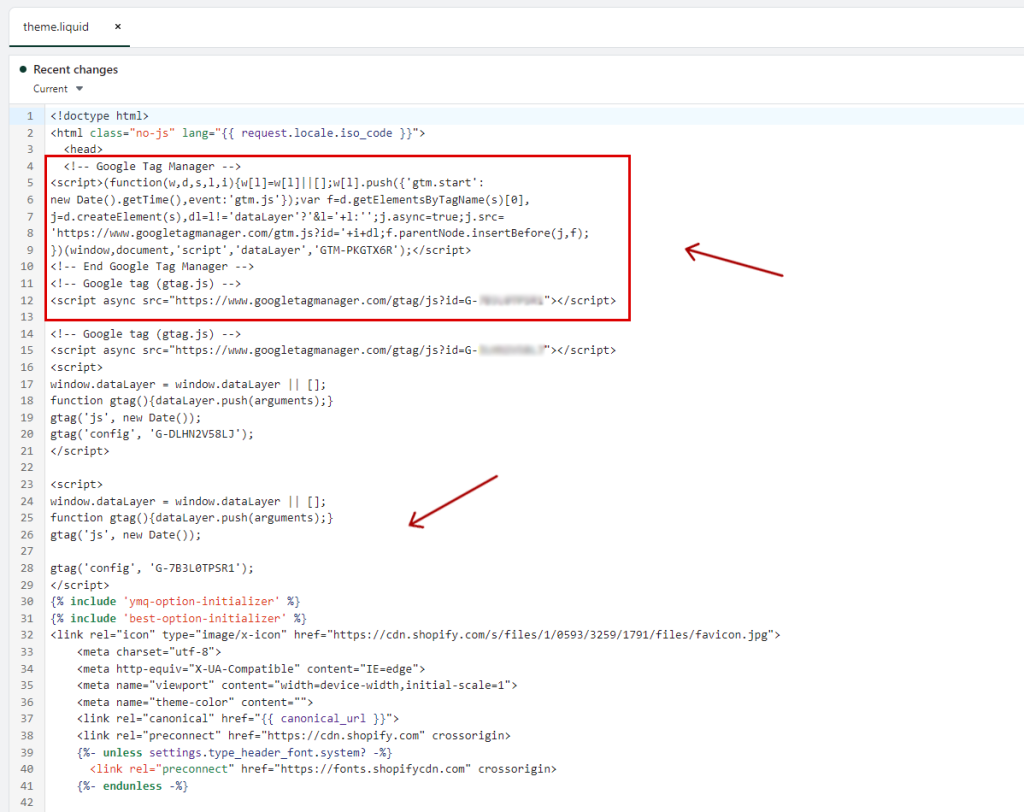
Step 10: Copy the customer details script below. Now, copy it and paste it above the GTM container code in the <head> section. This script will assist with passing the USER-scoped data to the GA4.
<script>
window.dataLayer = window.dataLayer || [];
window.dataLayer.push({
{% if customer %}
userType: “member”,
customer: {
id: {{ customer.id }},
lastOrder: “{{ customer.orders.first.created_at | date: ‘%B %d, %Y %I:%M%p’ }}”,
orderCount: {{ customer.orders.size }},
totalSpent: {% if customer %}{% assign total_spent = 0 %}{% for item in customer.orders %}{% assign total_spent = total_spent | plus: item.total_net_amount %}{% endfor %}{{ total_spent | money_without_currency | remove:”,” }}{% else %}””{% endif %},
tags: {{- customer.tags | json -}}
},
{% else %}
userType: “visitor”,
customer: {
id: “”,
lastOrder: “”,
orderCount: “”,
totalSpent: “”,
tags: “”
},
{% endif %}
});
</script>
Step 11: On the theme.liquid, in the upper right-hand corner, click Save.

The first step in adding GTM container code to Shopify has been completed. On the checkout page, you must then include the purchase Data Layer, customer details script, and GTM container code.
Also, Read: 13 eCommerce SEO Best Practices for Your Online Business
Second phase: The purchase Data Layer, customer details script, and the GTM container code should be added to the checkout page.
Step 1: Click the Settings button in the lower left corner on the Shopify store admin.

Step 2: Select Checkout and accounts.
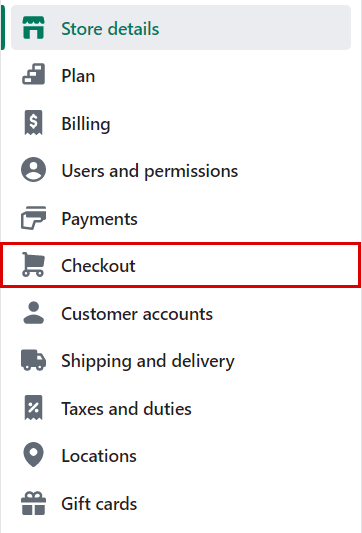
Step 3: Find Additional Scripts below the order in the status block.

Step 4: First, paste the GTM container code. Copy the customer details script given below and paste it above the GTM container code.
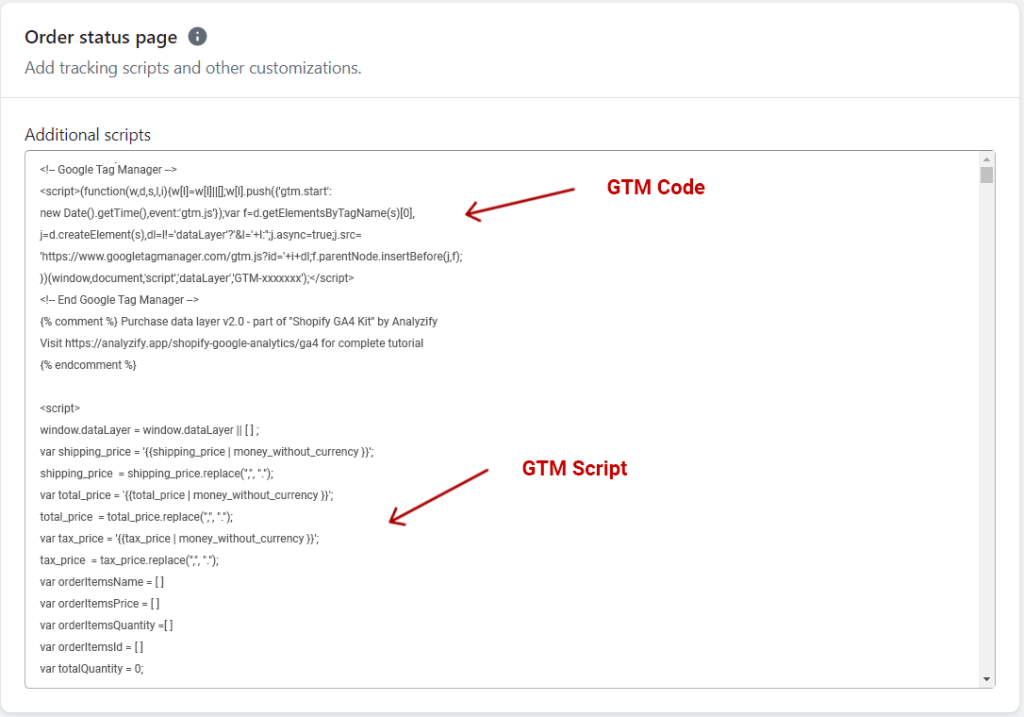
Step 5: The purchase data layer given below should be copied and pasted between the customer details script and the code for the GTM container.
<script>{% if first_time_accessed %}
window.dataLayer.push({
‘page_type’: ‘purchase’,
‘event’: ‘purchase’, /* create a custom event in GTM */
‘transaction_id’: ‘{{ order.name || order.order_number }}’,
‘totalValue’: {{ total_price | money_without_currency | remove:’,’ }}, // Includes tax & shipping
‘subtotalValue’: {{ subtotal_price | money_without_currency | remove:’,’ }},
‘tax’: {{ tax_price | money_without_currency | remove:’,’ }},
‘shipping’: {{ shipping_price | money_without_currency | remove:’,’ }},
‘currency’: ‘{{ shop.currency }}’,
‘payment_type’: ‘{{ order.transactions[0].gateway }}’, //optional parameter
‘ecommerce’: {
‘checkout_currency’: ‘{{ checkout.currency }}’,
‘value’: ‘{{ checkout.total_price | money_without_currency | remove:’,’ }}’, // order total (price of all products + shipping)
‘tax’: ‘{{ checkout.tax_price | money_without_currency | remove:’,’ }}’, // tax
‘shipping’:'{{ checkout.shipping_price | money_without_currency | remove:’,’ }}’, // shipping costs
‘transaction_id’: ‘{{ transactions[0].id }}’, // transaction id
‘items’: [
{% for line_item in line_items %}
{
‘item_name’: ‘{{ line_item.product.title | replace: “‘”,”##@@singleinvertedcomma@@##” }}’.replace(“##@@singleinvertedcomma@@##”, “‘”),
‘item_id’: ‘{{ line_item.sku || line_item.product.id }}’,
‘price’: {{ line_item.final_price | money_without_currency | remove:’,’ }},
‘item_brand’: ‘{{ line_item.vendor }}’,
‘quantity’: {{ line_item.quantity }},
‘item_variant’: ‘{{ line_item.variant.title }}’
},
{% endfor %}
]
}
});
{% endif %}
</script>
Step 6: On the lower right-hand corner, click Save.
You have successfully added the GTM container code. Before creating the GA4 Page View Tag, we will now move on to creating Data Layer variables on the GTM. At the point when the page view tag gets loaded, these variables will permit us to gather and pass user-scoped data to GA4.
Also, Read: Shopify SEO Guide: How to do Shopify SEO
Create Data Layer Variables on GTM
Follow the upcoming steps to create Data Layer variables on the GTM.
Step 1: On the GTM, click on Variables on the left-hand navigation panel.

Step 2: Under User Defined Variables, select New.
Step 3: Select Variable configuration.
Step 4: Select Data Layer Variable from Page Variables.
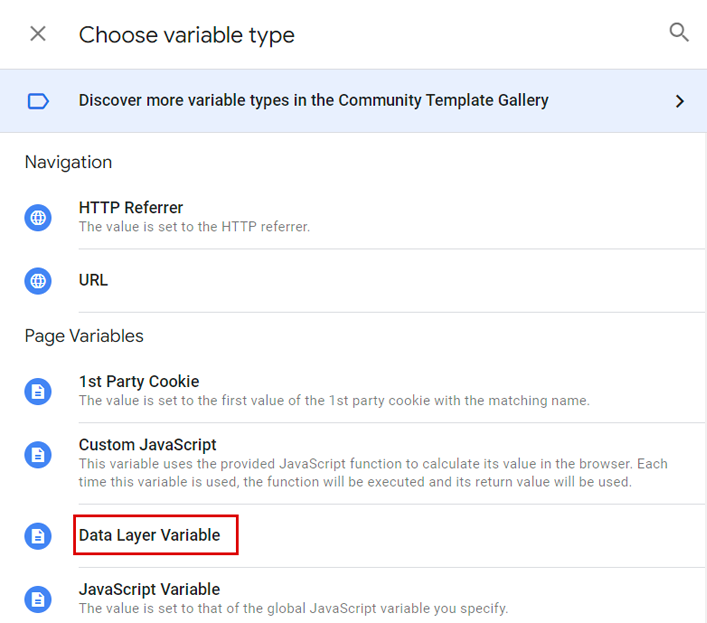
Step 5: Enter the Data Layer Variable Name.
Step 6: Change the variable’s name and select Save.
Following the above steps, create the below Data Layer variables.
| Data Layer Variable Name | Rename the Variable |
| customer.lastOrder | “dlv – customer – lastOrder – Variable” |
| event | “dlv – event – Variable” |
| customer.tags | “dlv – customer – tags – Variable” |
| user_id | “dlv – customer – id – Variable” |
| customer.userType | “dlv – customer – userType – Variable” |
| customer.orderCount | “dlv – customer – orderCount – Variable” |
| customer.totalSpent | “dlv – customer – totalSpent – Variable” |
Create GA4 Page View Tag On the GTM
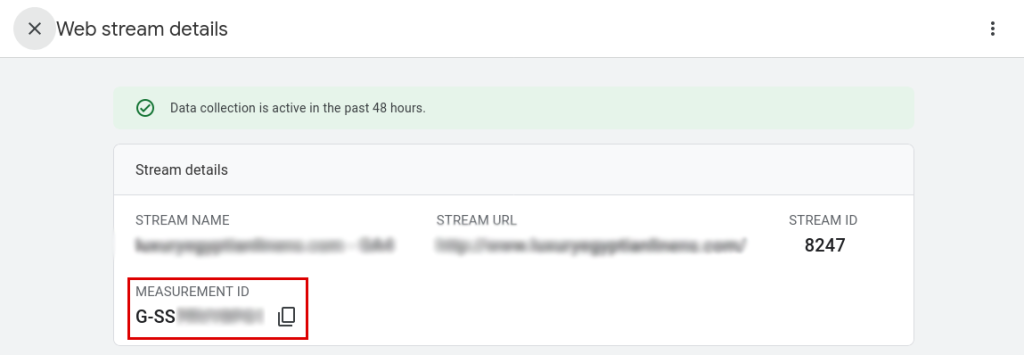
Step 1: Select GA4 property in Google Analytics: https://analytics.google.com/
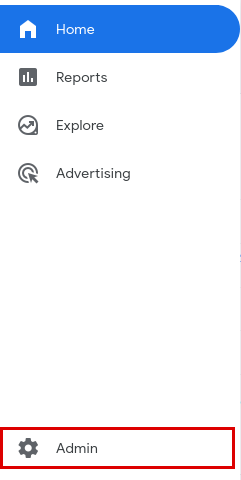
Step 2: Click on the Gear Symbol at the left bottom.
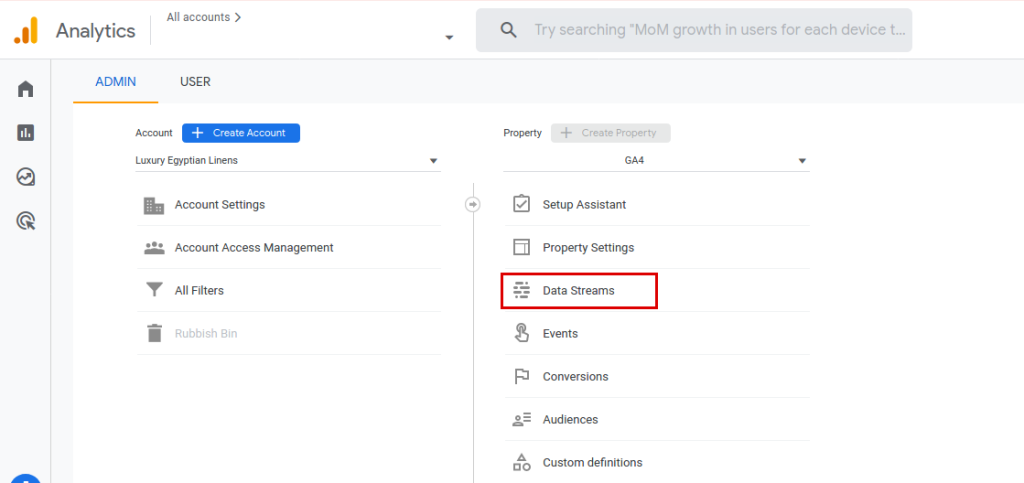
Step 3: Click on the Data Streams found under the property level.
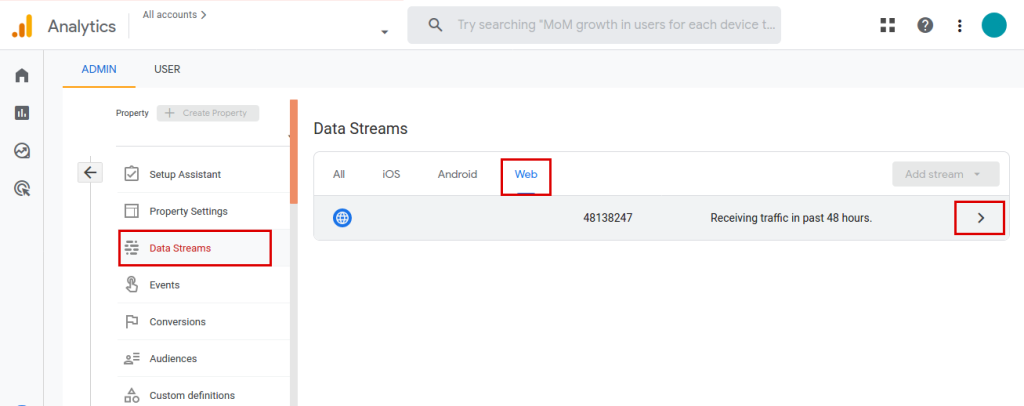
Step 4: Select the Web Stream and then click the arrow (>).
Step 5: Copy the GA4 Measurement ID.
Step 6: Log in to the Google Tag Manager: https://tagmanager.google.com/
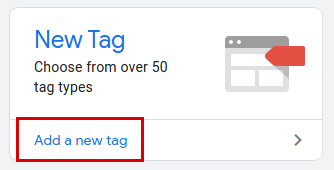
Step 7: Select “Add new tag.”
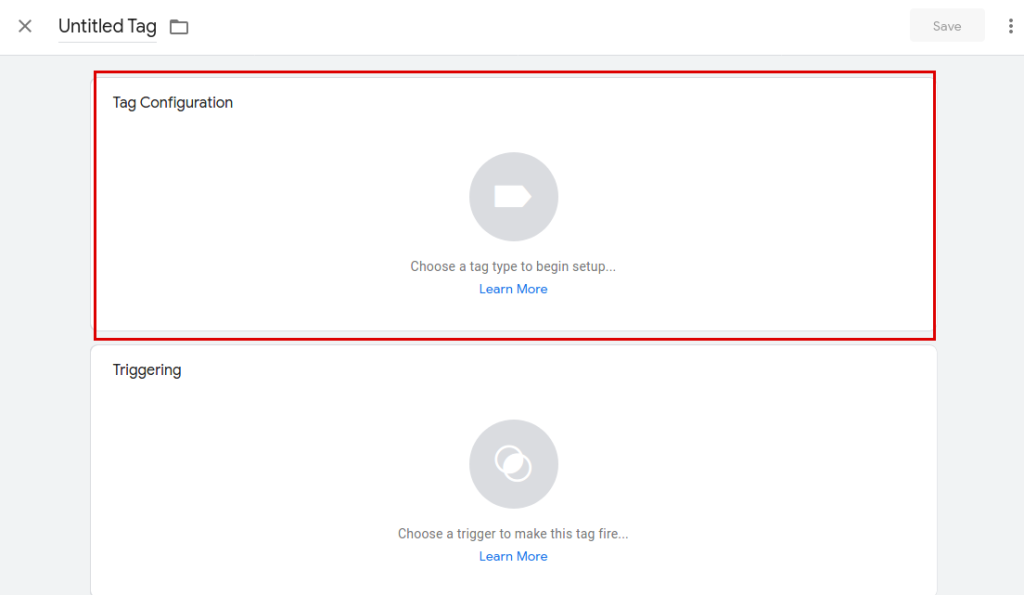
Step 8: Click on tag configuration.
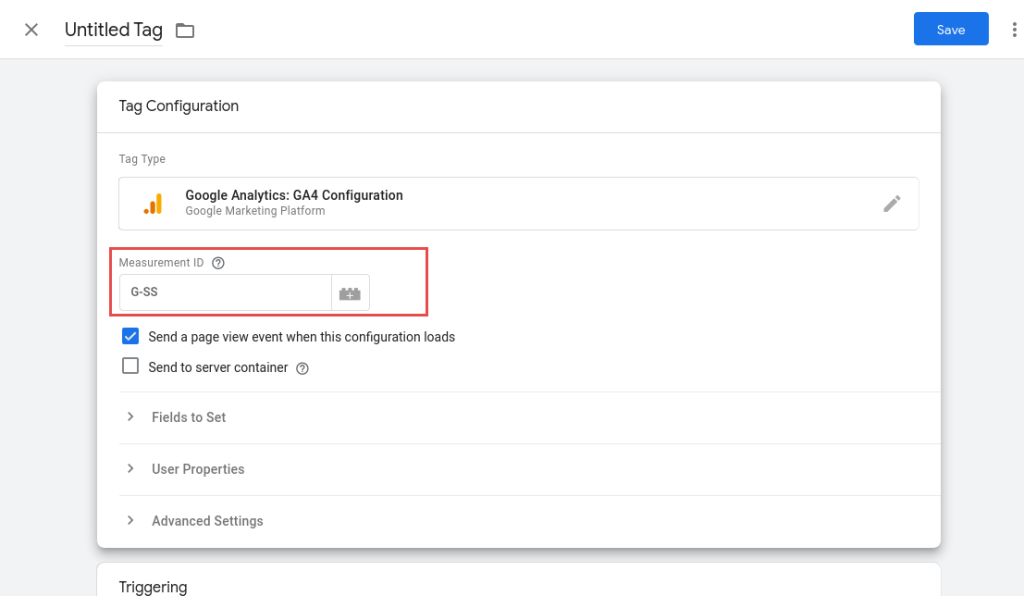
Step 9: Select Google Analytics: GA4 Configuration.
Step 10: Under the “Measurement ID” box, paste the GA4 Measurement ID that you previously copied.
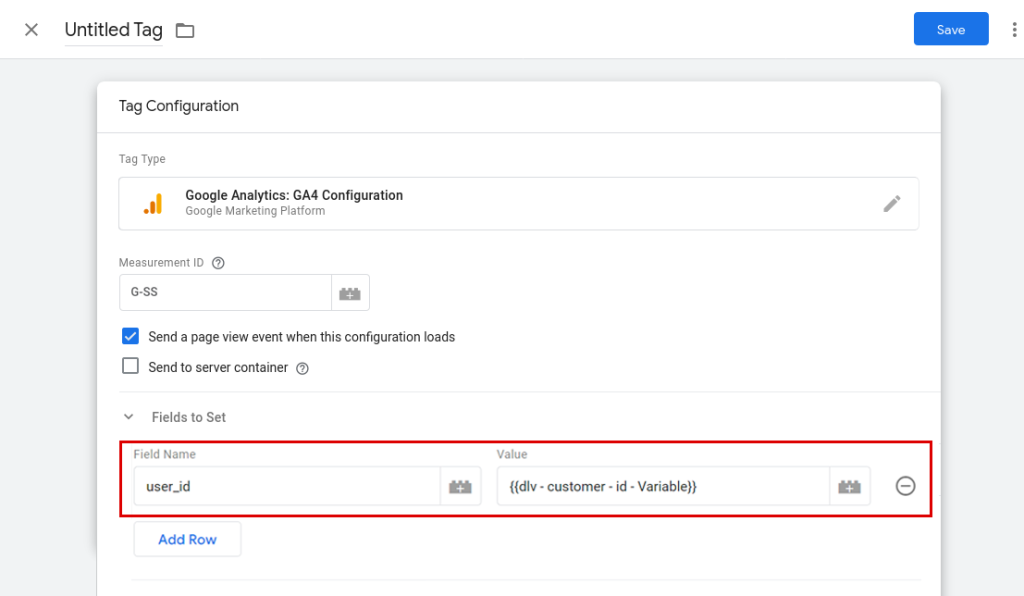
Step 11: Click the add row button under Fields to Set, then enter the name of the field and its value as outlined below:
Field Name: user_id
Value: {{dlv – customer – id – Variable}}
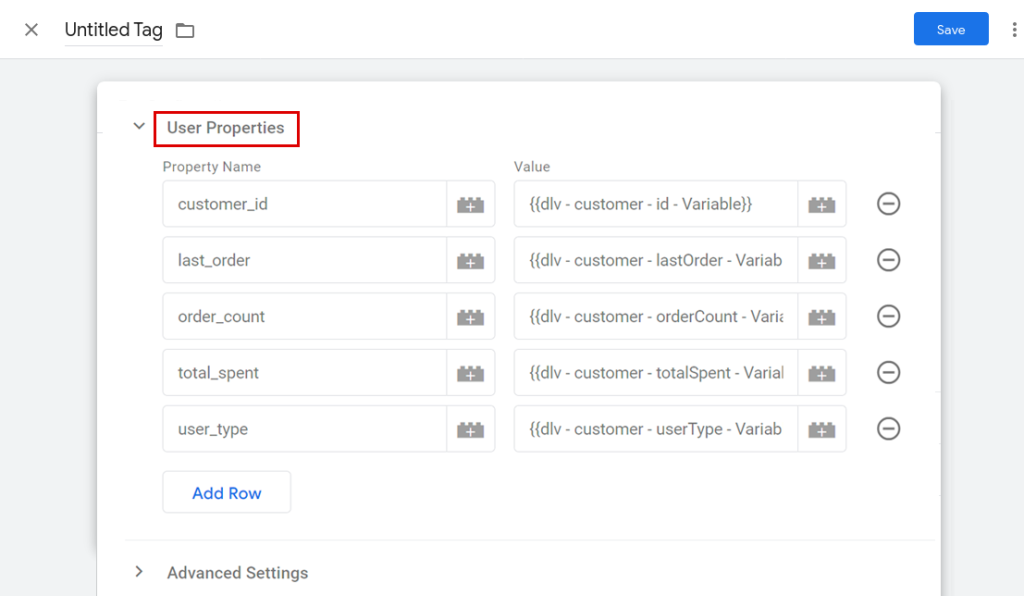
Step 12: Add the Property Name and Value described below to User Properties.
Step 13: Click on Triggering.
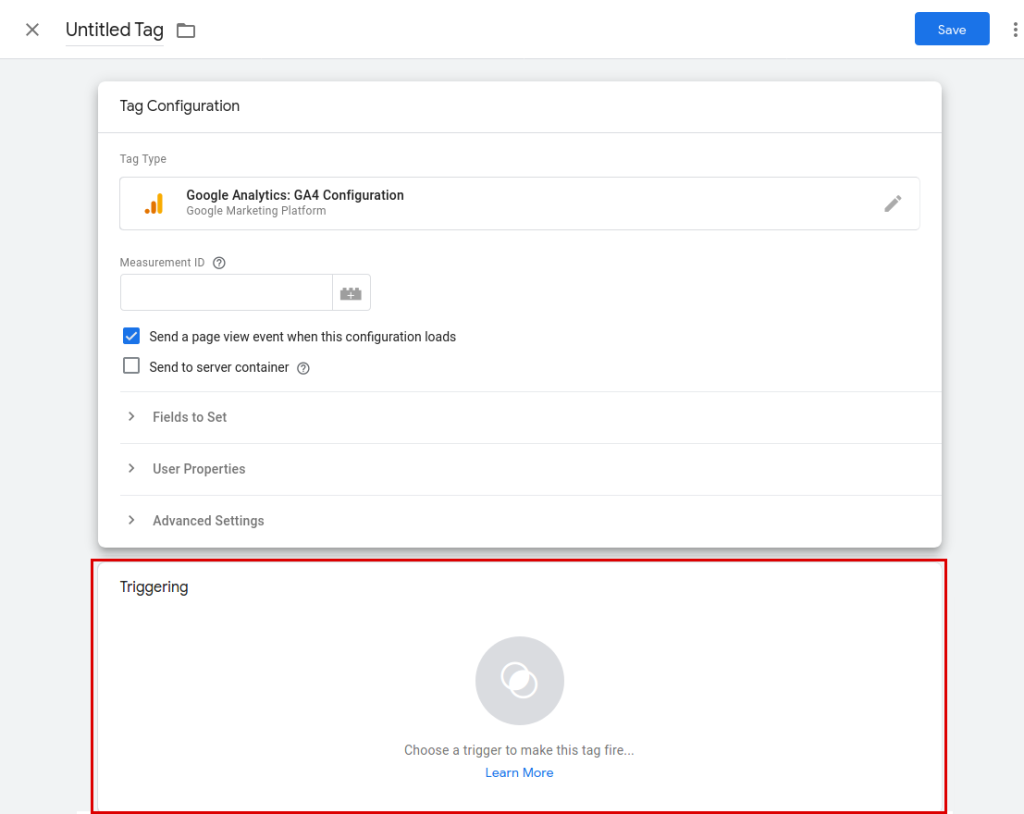
Step 14: As a trigger, select All Pages.

Step 15: Rename the Tag to GA4, and then click Save.
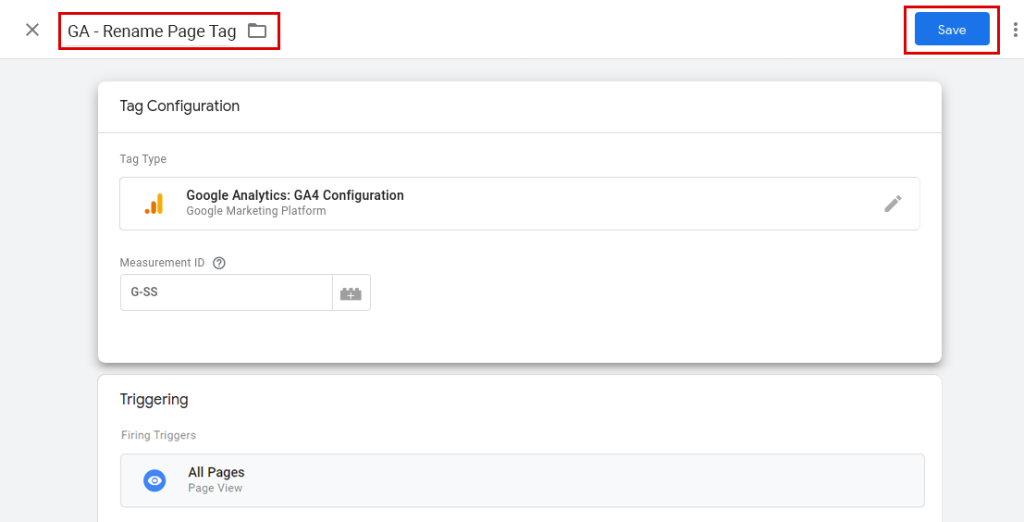
The GA4 Page View Tag is now created. Now, let’s look at how to send the GA4 the necessary information by tracking the view_item event whenever someone views the product page.
Track and pass view_item and purchase event data to GA4
First Phase: On Shopify, add the view_item Data Layer.
Step 1: Click on Themes under Online Store on the left-hand navigation panel after logging in to your Shopify store.

Step 2: Under the Actions drop-down, select Edit code.

Step 3: Under Sections, select main-product.liquid.
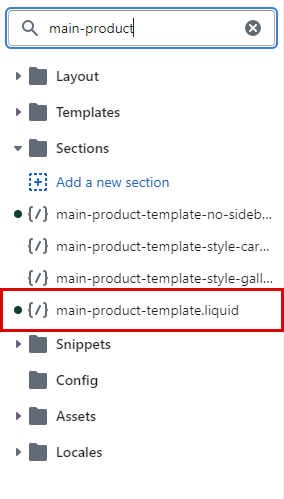
Step 4: Paste the below Data Layer script.
<script>
window.dataLayer = window.dataLayer || [];
window.dataLayer.push({
event: ‘view_item’,
ecommerce: {
items: [{
item_name: ‘{{ product.title | replace: “‘”,”##@@singleinvertedcomma@@##” }}’.replace(“##@@singleinvertedcomma@@##”, “‘”),
item_id: “{% if product.sku %}{{ product.sku }}{% else %}{{ product.id}}{% endif %}”,
price: “{{ product.price | money_without_currency | remove:’,’ }}”,
item_brand: “{{ product.vendor | remove: “‘” | remove: ‘”‘ }}”,
{% for collection in product.collections %}
item_category{% unless forloop.index == 1 %}{{ forloop.index }}{% endunless %}: “{{ collection.title }}”,
{% endfor %}
item_variant: “{{ product.selected_or_first_available_variant.title | remove: “‘” | remove: ‘”‘ }}”,
quantity: ‘1’
}]
}
});
</script>
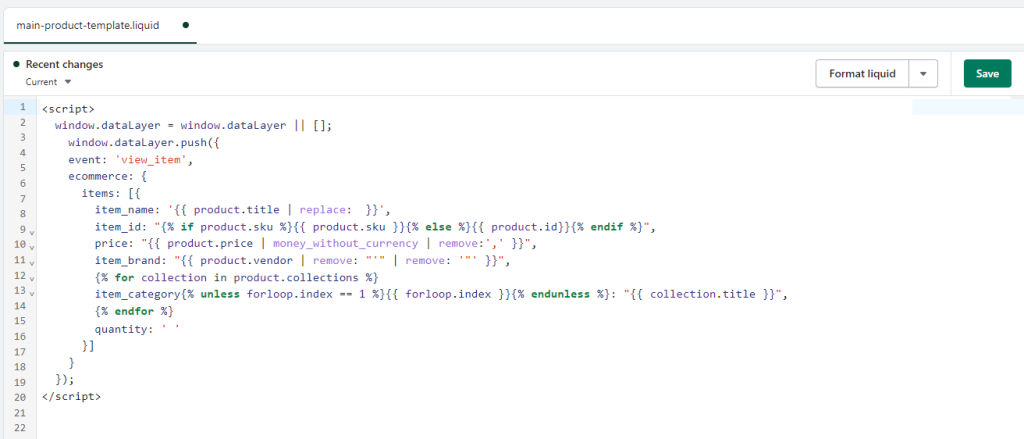
Step 5: On the main-product.liquid page, in the upper right-hand corner, click Save.
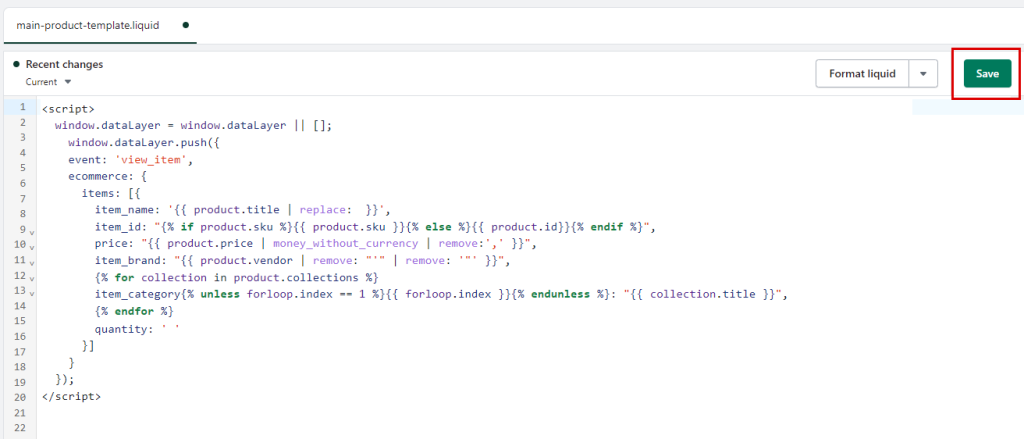
Second Phase: Create GTM Trigger for the view_item and the purchase event
Step 1: Log in to the Google Tag Manager.
Step 2: On the left-hand navigation panel, select Trigger.

Step 3: Select New.

Step 4: Click on Trigger configuration.
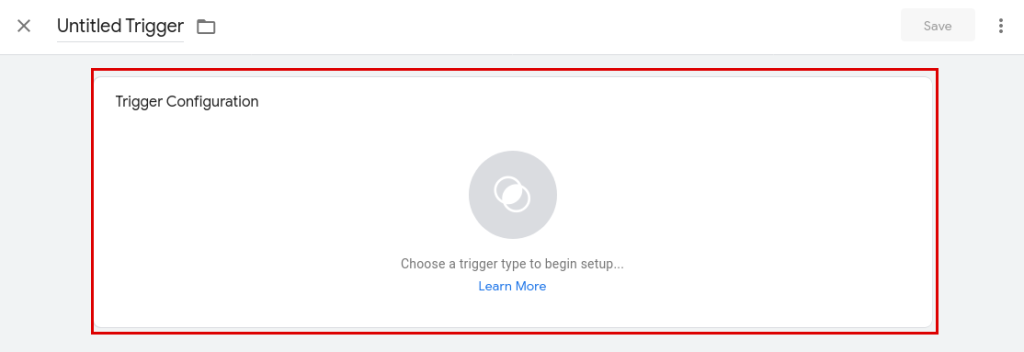
Step 5: Click on Custom Event under Other.
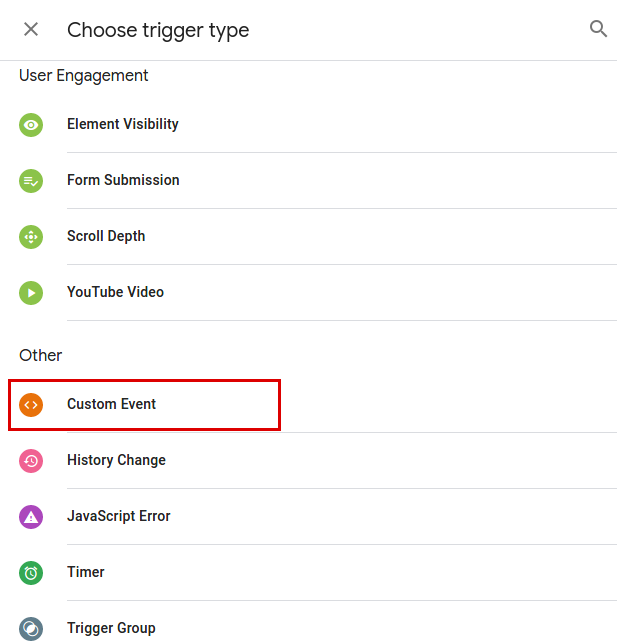
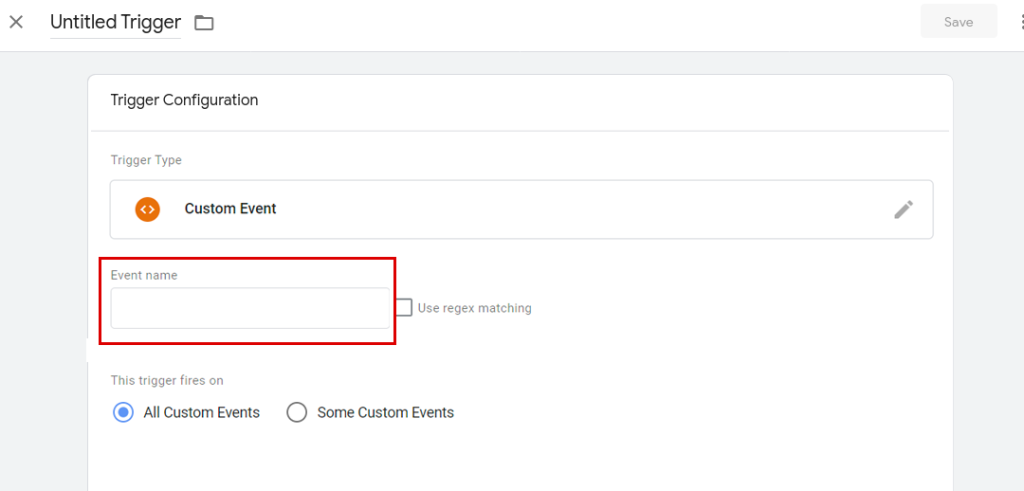
Step 6: Create Event Name as view_item.
Step 7: Click Save after renaming the trigger CE – EEC – view_item – Trigger.
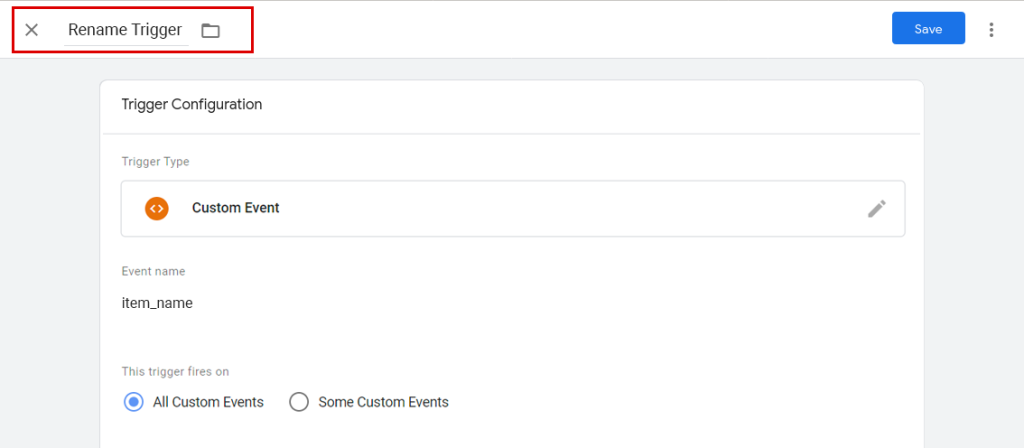
Following these steps, the view_item event trigger has been created. Now you should make a purchase event trigger. Follow the first five aforementioned steps to create a purchase event trigger.
Step 8: Assign the Event Name as Purchase
Step 9: Click Save after renaming the trigger CE – EEC – purchase – Trigger.
After you have followed all of these steps, you have done nearly everything to gather view_item and purchase event related data from your Shopify store with the user-scoped data. Now let’s see how to use Google Tag Manager to send these details to GA4.
Third Phase: Create a GTM Tag for the view_item and purchase event
Step 1: On the left-hand navigation panel, select Tag.

Step 2: Select New.

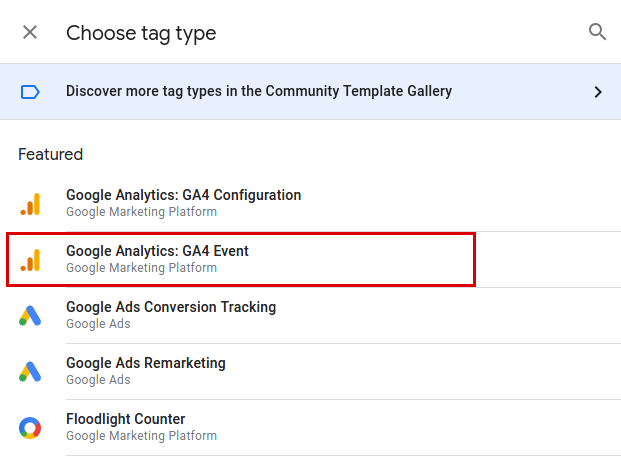
Step 3: Click on Tag configuration.

Step 4: Choose “Google Analytics: GA4 Event” under the Featured Tag.
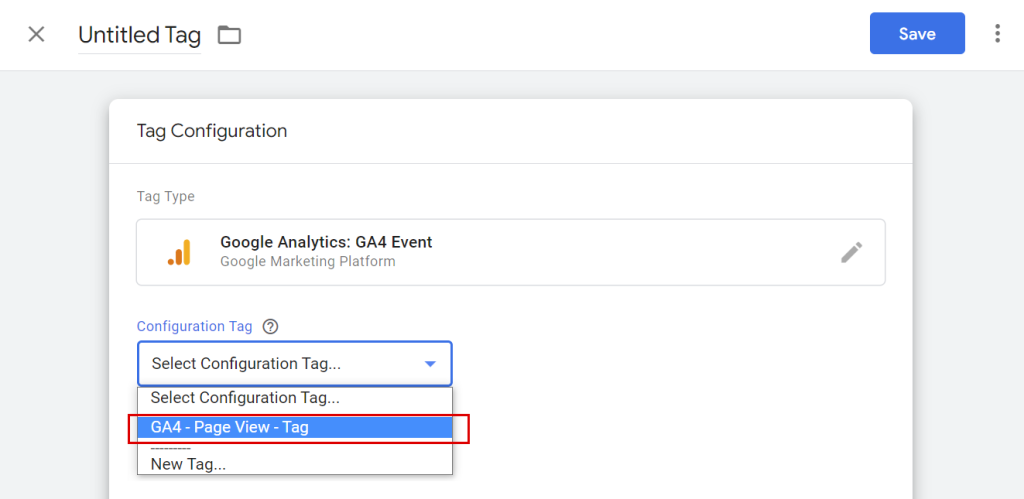
Step 5: Choose “GA4 – Page View – Tag” from the drop-down menu in Configuration Tag.
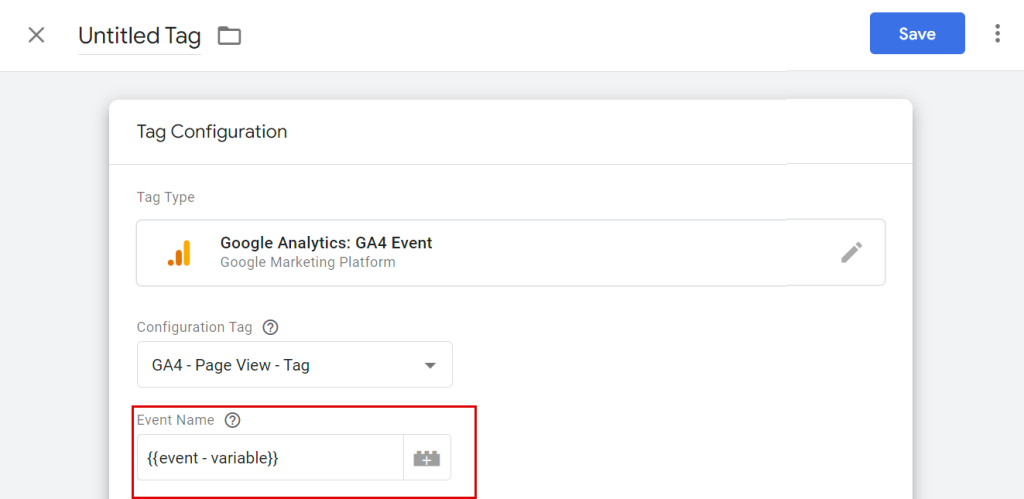
Step 6: Give the event a name. Select the Data Layer variable that was previously created – {{dlv – event – variable}}
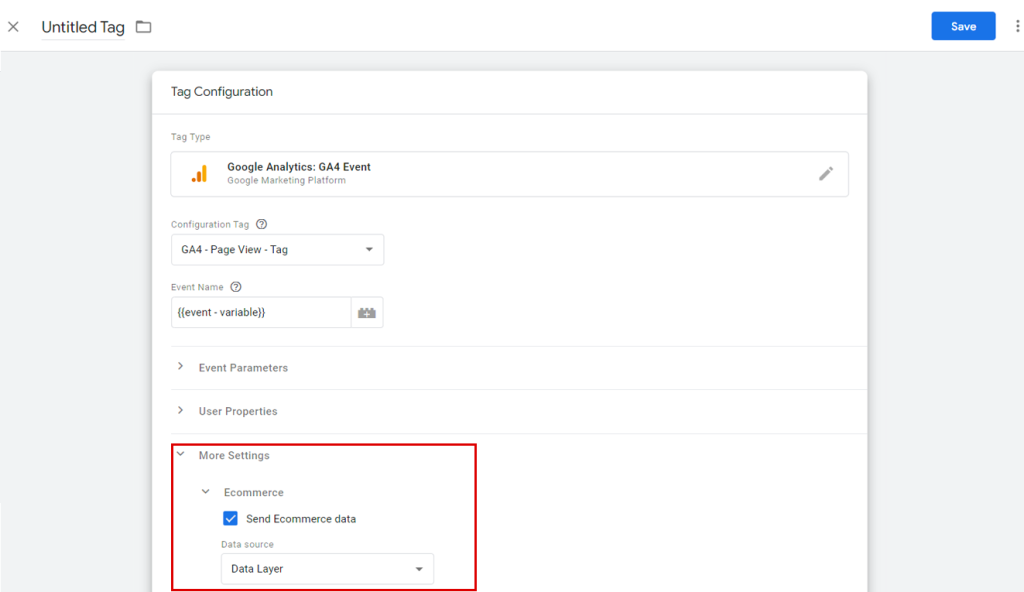
Step 7: Select “Send Ecommerce Data” under E-commerce from More Settings. Choose “Data Layer” as the Data source.
Step 8: Click on Triggering.

Step 9: For the view_item event, pick the previously created trigger labeled “CE – EEC – view_item – Trigger.”

Step 10: Click the pencil icon by hovering over the top right corner of the Trigger section.

Step 11: Now, click on the plus sign.

Step 12: Select the purchase event trigger labeled “CE – purchase – Trigger”.
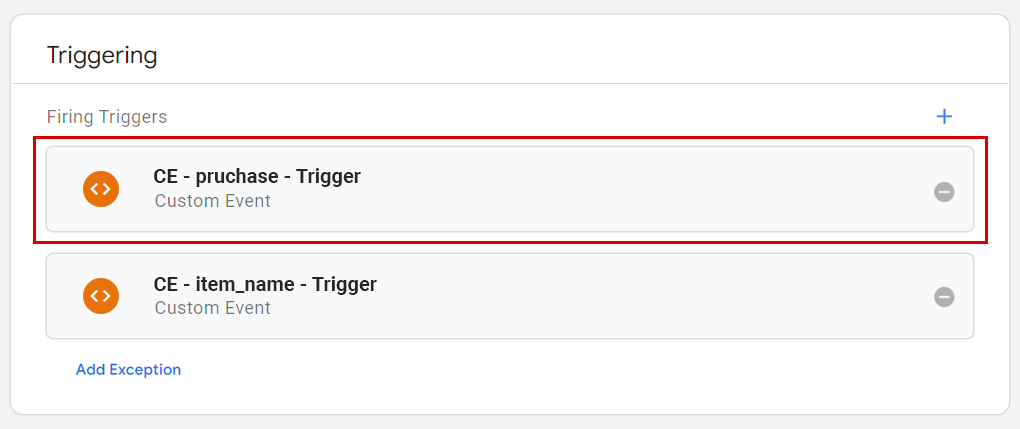
Step 13: Change the Tag’s name to “GA4 – EEC event – Tag” and click on Save.
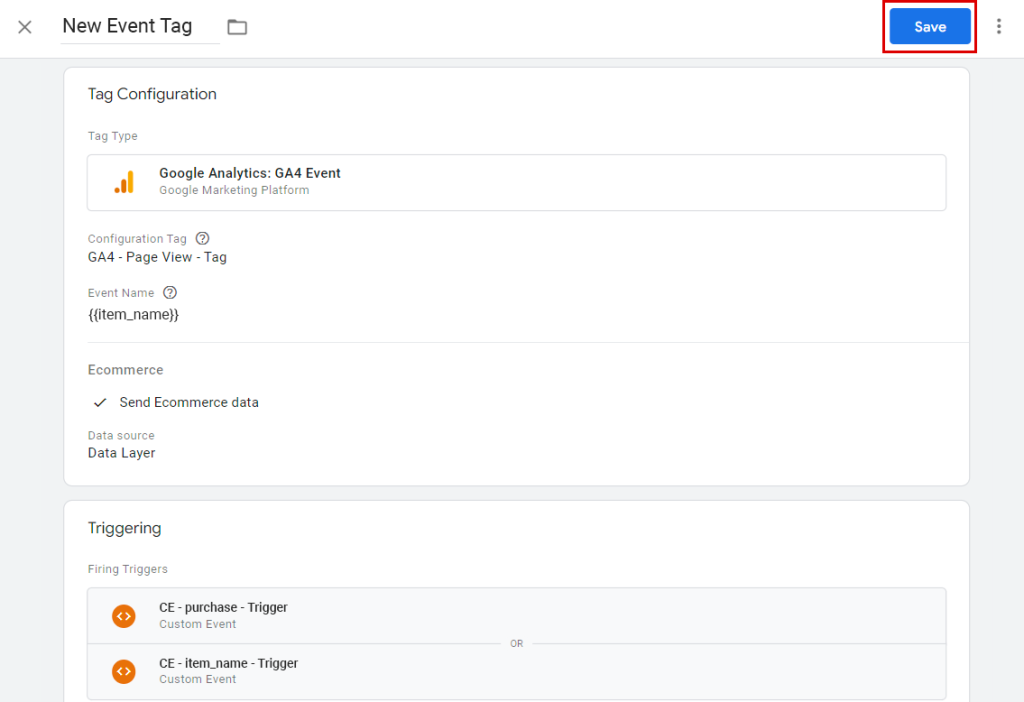
With the help of this guide, you can track view products and purchase event data on GA4. Follow these steps to view the reports on GA4 as well.
Step 1: Go to GA4 property.
Step 2: From the left navigation panel, select Reports.
Step 3: Click on Ecommerce purchases after clicking on Monetization.
To Conclude
You can publish your GTM changes once you are satisfied that transactions are being recorded in your GA4 ecommerce tracking. After publishing, we recommend giving close attention to your GA4 account to ensure that orders are recorded as expected. Ecommerce tracking can have numerous subtleties and it is hard to address them in a single article. We hope that we have given all the necessary details in this step-by-step guide to set up GA4 tracking and also address and resolve the pressing issue that affects all Shopify store owners.
FAQs
Does Shopify automatically track events for GA4?
No, shopify cannot track events on its own. You have to track it manually using gtag.js or Google Tag Manager.
What is Google Analytics 4?
Google Analytics 4 is the latest version of Google Analytics and is the successor of Google Universal Analytics.
Is it possible to install both Google Universal Analytics and GA4 on Shopify?
Yes it is possible to set up both Google Universal Analytics and GA4 on Shopify and you can do it with the help of Google Tag Manager.


